Thursday, December 31, 2009

Wings of War night

Last night I hosted a Wings of War evening. Wings of War is a miniatures based air combat game, with a dedicated fan following. We used their 1/144 scale pre-painted WWI biplane models for the games. Currently, their are 36 different models, with a new set involving observation balloons and more planes coming out in the new year.

In the photo below, Alaric, Frederick and Dallas contemplate German tactics.


Most of the players had never played the game before, but this didn't turn out to be a problem. Game play is very simple and elegant:

Each model comes with its own set of maneuver cards specifically designed for it, with large arrows on them. The player controlling a plane plans his turn, choosing three cards in sequence and putting them face down on the gaming mat. All players reveal at the same time the first card for the turn, put it in front of the plane and move the latter so that the little arrowhead on the rear of its clear flight stand matches the arrow in front of the maneuver. Planes thus "fly" on the tabletop. This is repeated for each of the subsequent phases, for each turn.

A ruler (provided in the game) is used to see if a plane has enemy planes in its field(s) of fire; if so, the player may choose a target. The target plane's player must draw a damage card with a random amount of points (optional rules cover special damages, too). Short range fire (up to one-half ruler distance) means two damage cards drawn instead of one. Maneuvers available, firepower, and amount of damage sustained before being eliminated all depend on the specific airplane chosen.


Below, Kevin and Brian observe the results of the Allies' cunning plan.


After a short while, the players weren't thinking a lot about the game mechanics any more. Rather, they were concentrating on anticipating their enemies' moves, and on how to best utilize their own plane's advantages.

We were able to get in a half a dozen games, trading planes and sides throughout the evening. Some battles were just straight shoot 'em ups. The last couple were bombing scenarios, where a force comprised of a two-seater escorted by some fighters was opposed by a flight of enemy fighter planes.


Highlights included:
  • My DH-4 being blown out of the sky by Frederick's multi-coloured Albatross D.III, just shy of my target

  • Alaric's Roland C-II was on fire, but he still was able to drop its bombs on target - just before being shot down by the combined fire of Kevin's Sopwith Camel and my Nieuport 17

  • After all other planes on both sides were shot down or fled, Alaric's all-red Albatross D.III was left alone on the table, a menacing presence to be sure

Thanks to Alaric, Brian, Dallas, DaveO, Frederick and Kevin for taking part in the festivities.

Happy gaming, and have a safe and happy New Year!


Trucks for the Truck Stop and a mini-batrep


Note: click on the photos for larger images.

When playing Warhammer 40K, I very much like playing objective-based scenarios, like the ones written for the Astronomi-con tournament series. One of my favourites is "Truck Stop". The model trucks Christian, Mike and Keith use for Astro were custom built by some generous folks in Ontario.
I wanted to be able to run the scenario on my own table, so I purchased a half dozen "Rebel" light utility trucks from Old Crow Models. Also, such vehicles will be useful for any number of scenarios for 40K, Stargrunt II, Gunschwarm, Zombieland and the other sci-fi games we play.

These Rebels are very sweet model kits. Old Crow cleans up the models before they post them out. In addition, the resin they use is of very fine quality, with no bubbles or pitting. The six trucks went together in about the same time as just one 15mm scale T-60 light tank from the Flames of War line (examples are seen to the right in the above picture). Mold lines, mold mis-keys, and thin lead gun barrels that need to be replaced with wire all contribute to the slow progress on my Soviet "Tankovy" battalion. On one truck I added a plastic 40K machine gun from my spares box, mounted on a searchlight stand.

I finished the basic painting on some Rebels in time for a fun game with Duncan on Tuesday (I'll have to go back and weather those trucks at some point...).

***

Duncan rolled with a Thousand Sons Chaos space marines army, and I went with my usual mechanized Eldar. That is, skimmer tanks (with some mechanized infantry), jump troops, and jetbike mounted HQ - very, very fast. As the game started, trucks scattered all over the table. Both sides' Reserve rolls were sub-par; the Eldar forces came on piecemeal, and the Chaos forces only received their Vindicator assault tank late in the game.

Some game highlights:
  • The Eldar Farseer accidentally blowing up a truck and its contents (oops!)
  • The Farseer single-handedly holding up an entire Raptor squad of jump troops for multiple turns (yay!), before finally falling (boo!)
  • Eldar Warp Spiders trying to keep a truck and its cargo out of Chaos hands but failing to destroy it like they wanted to (rats!), whereupon the Raptors attacked the Spiders and clubbed them down like baby seals (sigh)
  • Half the Eldar Fire Dragons being consumed by the explosion of their target, the Vindicator tank (funny!)
  • Two entire squads of Thousand Sons marines, including a Chaos Sorcerer, brought low by massed gunfire, plus the energy blades of the surviving Howling Banshees (ouch!)
At the end of the game, each side had one prize in their hands. A slight advantage was granted to the Eldar due to secondary game objectives - control of more table quarters and having more scoring units alive at the end of the game

In after-game discussion, we discussed how one of the Thousand Sons squads spent valuable time trying to chase on foot after a truck, instead of helping support the other scoring unit. This allowed the Eldar to use their skimmer tanks to keep those squads separated and subsequently defeat them in detail. Mutual support is important in objective-based games. A squad can be doing its job merely by staying alive.

In the picture below, Corporal Parnell's gunner/mechanic, Lance, decides that discretion is the better part of valour after the destruction of the Thousand Sons.


Edited to add Jan. 3, 2010:
Added some light weathering with Country Grey, Burnt Sienna and Skin Tone Base acrylic paints:


2009: The Year in Gaming

Being that this is the last day of the year, I thought it would be enlightening to look back at the year of gaming that was 2009. I have tried to keep track through the year (on a mini-calendar on my office desk, no less) of what we, the Conscripts, got up to week-to-week.

Statistically, the most popular scale was definitely 28mm with 17 games played. The type of game most often played was - no surprise - Spacekrieg! (we played that 4 times) - followed closely by Star Wars miniatures and WWII, each played thrice. 6mm was a well-represented scale this year with 4 games. It was the most played scale after 28mm. We played 3 games in 15mm scale too.

Aircraft gaming was popular, we played 2 games of Aeronautica Imperialis and one of Airwar C21: Korea. We also played Check Your Six! twice and last night, Dave V. put on some very cool Wings of War games.

We also played in 40mm scale with a great "Three Musketeers" game staged by Curt, and a 40mm modern skirmish game. We gamed with Gladiators, killer cars in a Dark Future, Warhammer 40K and Fantasy, and Formula De. Even snuck in a couple of zombie games, and three painting nights for good measure!

Anyway, I thought you might be interested in these stats. Also, I wanted to take the opportunity to thank all of you for coming to my house to play with toy soldiers, and for inviting me to your house to do the same. I really don't think that there is a better bunch of gamers or friends around, and I feel fortunate to know and game with all of you, and count you as my friends.

Cheers, and best wishes for the New Year.


Dallas

ps see you for 40K on New Years Day!! d.

Tuesday, December 15, 2009

All three dreadnoughts done!

I bought the first one when the plastic model first came out and gave it a TL Heavy bolter. They took that option out of the next edition, so I bought another one and made it a long range dread. The third one I bought because I wanted to play with magnets. I originally painted them all as Salamanders, but unfortunately the paint job sucked. I didn't see the point in repainting one and not the others, so I redid them all and magnetized the weapon arms of the first two.
Now I just have to put the finishing touches on a few Rhino's and I should have a 1500 point SM army ready to go.

Gotta Love Monday Night Football

I have to say, Monday Night Football is a great way to get some painting done. Especially when it is an NFC West game featuring the Cardinals (who are really not a good team, no matter how hard the pundits try to spin it) and the 49ers (who got so used to being a good team way back, they have completely forgotten how to bee a good team since, and now suck).

The game provided a great chance to finish a couple of figs. Up first, a new officer for Gün Schwarm, who clearly need improved battlefield direction following last week's debacle.


I also finished a second unit of Seven Years War 6mm Austrians, and a command base. The figs are from Adler and are based for "Might & Reason".


I'm about half-way through the infantry pile that came with the "Leuthen Battlepac".


Assuming I actually get any Christmas holidays, I hope to finish more by the new year, and also start on some of the cavalry. I just waiting on an Osprey book before I get started on that...

Friday, December 11, 2009

After Action Report: Future Gordon Brown Celebrates Bloated Victory


Taking a break from my recent horse & musket focus, last night we played a game of Future War at my place. Mike F rolled out with his FutureBritz, including some newly converted and painted AT-43 suits. I deployed Gün Schwarm, with the new "Space Hetzer", and the 40k Valkyrie as part of the lineup. Brian and Cam came out too. Brian joined me on the Gün side, and Cam and Mike rolled with the Britz (New Labour - there's an app for that).

We set up on a 6'x4' table and fought over a village. No big reason was given - perhaps it was emitting too much carbon? We'll never know, in particular because of Mike's Future Churchill...

Suffice to say, it was a brutal outing for Gün Schwarm. We got a few kicks in, slaughtering some infantry, but the Britz knocked our vehicles to pieces in the space of four turns, and we did a terrible job of replying. The Valkyrie killed a few Brit infantry, and deployed a squad on to one of the objectives on the table, but a pair of "pie-plate" blasts from Mike's Space Churchill eliminated that threat.

It was a decisive win for the Britz. Even the Schwarmbot got smacked around! The Gün Schwarm Ministry of Information will have its work cut out when it comes to spinning this disaster.

Here are some pics from the game:


Mike F's brits looked awesome. Thanks to everyone for coming out!

Monday, December 7, 2009

Some (blurry) SYW Progress

More progress over the weekend on the Seven Years War project. I have almost finished my first 6mm Austrian unit. I am basing them for the "Might & Reason" rules by Sam Mustafa. The rules are abstracted to brigade level, and each "unit" is represented by two bases, two-inches wide and one inch deep. I didn't actually know how many 6mm infantry figures I could pack on to the bases, so it was a bit of an experiment. Turns out the answer is 20 per base, meaning 40 castings per unit.


The picture above(sorry - it's a bit blurry) shows the unit nearly completed, with the section on the right still "baking" into the goop, while the section on the left has been painted and had some static grass added.

I can remember Brian H. mentioning to me that one of the few criticisms of the "Might & Reason" rules was the basing system, and he definitely has a point - it's hard to place the standard carrier and command group in a way that feels "right" when your frontage is divided equally across two bases. But I decided to stick with the two-base system anyway, because I'm too impatient to wait for more bases, and one postive is that I find it creates a sense of the rigidity that permeated the linear doctrines of the era (i.e. it should not look right UNLESS you are in line).

Further progress tonight - hopefully Monday Night Football will provide a background to finish a second unit.


PS - here is a blurry pic of the finished unit - using a flag for the Napoleonic setting - a bit beardy, but it's 6mm so I figured it was close enough.. (Hey Brian - I need some flags!)

Monday, November 30, 2009

Road Trip and SYW Plunge

I had to head out to Toronto last week for work. I figured that since I was going to be away for a chunk of time, I might as well bring some "homework" with me - a bunch of Napoleonic French 25/28mm plastics from the Perry range as I gradually expand my army....the plan nearly backfired, as the exquisitely incompentent buffoons at Air Canada decided that my luggage and I had no need to be on the same plane, but I managed to get 11 guys done last week! Being away from home sucks, but at least you get work done.


Of course, this is an "all-trenchcoat" unit, so it is kind of like cheating, as the coats paint up pretty fast compared to the uniforms. I finished the command group for these guys on the weekend (unfortunately the command is not in great coats...oddly, that is the one oversight of the Perry collection, if you can call it an "oversight" - it is a pretty magnificent line-up and I'm not about to complain). That unit is "baking in the goop" waiting for final basing.

Switching gears, some of you may dimly remember some smack-talk (by me) of painting up a "Leuthen Battlepac" of 6mm Austrians from the Seven Years War that I had inexplicably obtained about three years ago (I believe a distributor sent it to me as a 'makeup' for an incredibly late shipment of 6mm Napoleonics - I never did get an explanation as to how SYW stuff would make up for Napoleonic stuff, but free is free). The bag was Austrian SYW stuff by Adler miniatures (outstanding 6mm figs) - about 180 musketeers, 24 grenadiers, 3 sets of command, some hussars, some cuirassiers, some artillery batteries and mounted officers - a nice set of stuff.

I don't know much about the SYW, but it is a period that has interested me because the uniforms are really, really neat - with the huge coats, cuffs, collars and tricorne hats! But I never got into it, given that I had enough other stuff on the go, and besides, once you have seen Brian H's 15mm collection of SYW stuff, well, really - what can you hope to add to that??? Also, any encounter with a Prussian Army of Frederick the Great's time tends to feel like you are playing against the Eldar in 40k.

On the other hand, 6mm - well, it has a different look, feel, and will be more forgiving (I hope) of the fact that I don't know a whole lot about the different units' facing colours etc. I started off painting a few "test" figs last night. These are Austrians in the "advancing" pose (I prefer the marching pose, but you go with what you have - like I said, it was free stuff).


I will base them to go with the "Might & Reason" rules by Sam Mustafa. With the test figures out of the way, I can get to a more "industrial" approach.


I have ordered some books for the armies of the period, so I can hopefully figure out other facing colours etc. and of course I'm hoping to get some flags from Brian too. If I actually get a Christmas holiday, look for a SYW war force in 6mm appearning in a Fawcett game soon.

Sunday, November 22, 2009

More Horse and Musket Madness

Some pics of recent progress from the painting table. Up first, a completed unit of Austrian 15mm regulars. These were completed in the midst of a recent mad run on some long overdue 15mm Napoleonic projects, which itself was inspired by a recent game.


This unit has only one flag (all of the other ones have two, but I'm running short of standard bearer models, and I have not noticed the extra flags helping the Austrians fight any harder!). This brings the total number of regular infantry units for the Austrians to 16 - still four short of my goal of 20, but one thing at a time.

Much MORE exciting is the completion of my very first unit of 25mm scale Austrians! Well, technically they are Hungarian, but you get the point. It only took me THREE YEARS to finish this group of 22 infantry and one mounted figure. I did the first 6 infantry three years ago, then 8 more, including the officers last year, and then finished the balance this week, including the excellent painting nite Dallas hosted. The figures are all from Foundry, and the bases provide a very satifying heft! Excellent banners (in this unit and the 15mm one) courtesy of Brian.


Hopefully this bunch will inspire me to proceed a little more quickly on reinforcements, but generally I am trying to get a critical mass of French done first in 25mm. Here is a (admittedly poor) photo of some French Voltigeurs I finished last week, based as skirmishers for Shako. The figures are Perry, from their plastic French infantry box set.


As you can tell from my insane scatter of different projects and periods, focus is not one of my strong suits! I have some other horse-and-musket nuttiness to go in my system (read - Leuthen Battepack) before I get back to preparations for the final showdown on Toxo IV...but I still harbour ambitions of a 25mm Napoleonic game sometime next year.

Tuesday, November 17, 2009

Another Poll Winner


Well, the latest poll has concluded, and it looks like 15mm Bavarians are the winner.

Regular readers of this blog will recall that we typically pressure/abuse fellow conscript Cam into painting something - indeed, anything. Cam, while we're on that topic, I understand the modern Chinese have arrived. I look forward to photos, uploaded via Iphone!

But for fun, it was time to pressure Mike F a little bit too. Thanks to our abuse of Mike F, he now collects British troops for, what is it, five different periods? And he's been great about it. His modern 25mm brits are awesome, as are the WW2 ones, and his 6mm modern brits have dished out (and received) quite a bit of abuse to my Warsaw Pact chaps. And who can forget Future Gordon Brown?

Seeing Mike F's strong progress along the path to the dark side, it's time for him to take the ultimate plunge. Come on Mike....I need to order some 15mm Austrian stuff anyways, so let's get some 15mm Bavarians from AB miniatures via Eureka, track down an Osprey book for painting reference (pictured above for convenience), and your journey to the dark side will be complete!

And I guess it's time to think of a new poll...

Thursday, November 12, 2009

Battle of Moreuil Wood

"It's a charge, boys!"

Yesterday, after attending our usual ceremony at the local cenotaph, I finished painting my Great War Canadian cavalry (fittingly, as it was Remembrance Day) and we set up a wargame for the evening. As I'd written beforehttp://wpggamegeeks.blogspot.com/2009/01/28mm-great-war-cavalry-from-blaze-away.html, I've wanted to game the Battle of Moreuil Wood, one of the last great cavalry charges in history. In that action, Lt. Gordon Muriel (!) Flowerdew (!!) won a posthumous VC leading the charge of Lord Strathcona's Horse against German infantry and machineguns outside Moreuil Wood.


The terrain set up above represents the eastern edge of the Wood (bottom) and the German positions (centre). Canadian dismounted cavalry troops are pushing through the Wood, while Flowerdew and the bulk of "C" Squadron of the LSH ride to cut off the German retreat. We used the new "Great War" ruleset from Warhammer Historical Games and played "The Pocket" scenario which seemed to fit the historical situation reasonably well. The game lasts six turns, and the victory condition for the attacker (Canadians) is to eliminate every scoring unit in the German deployment zone. Any result other than this is a German victory.

Cam took up the German command and deployed his troops (An Assault Company of three platoons, Company Command section, two HMG sections and a 77mm field gun, led by Battalion HQ).


Mike F. commanded the Canadians and used the scenario "reserve" rule to keep two cavalry troops and the Squadron HQ in reserve, while deploying the other two dismounted troops in the Wood, and his two HMG sections to the north.

The Germans and Canadians exchanged fire, with Cam seriously depleting one of the dismounted cavalry troops while Mike destroyed Cam's assault platoon with concentrated rifle fire. Cam's troops on the northern edge of his deployment zone, behind the wall, shot up one of Mike's HMG's but the other wreaked vengeance, killing half of Cam's platoon.

Then in turn two, Mike rolled for his reserves...

...and on they came! Mike deployed his cavalry on the far short table edge, opposite the Wood. Flowerdew had clearly taken the extra time to maneuver around to the flank of his enemy, and his cavalry worked into position for the charge.

1st Troop struck hard, killing the crew of the 77mm gun before it could fire a shot! Meanwhile, to the north, 2nd Troop charged home against the Germans defending the stone wall.
Unfortunately Flowerdew and his command section were caught in between in open ground and subsequently slaughtered by Cam's machinegun... making the posthumous VC possible after all. This was the end of turn three and things were not looking so good for the Germans. Shortly thereafter, Cam bid "auf Wiedersehen" and I took over the German command.
Sadly for Mike I brought a hot hand to the die rolling and the Germans started to come back, big style. The key for the Canuck cavalry was to hit hard and wipe out an enemy unit each turn. Even starting at a strength of ten models, they don't have the staying power to keep in close combat turn after turn with large enemy units. However this is just what happened. The Germans on the stone wall lasted two turns longer than expected and whittled the cavalry down. The German battalion commander, Major Haase, turned out to have a real taste for mixing it up hand-to-hand and ended up the sole survivor of his HQ group. Luckily the Assault Company command section was able to charge in and help him out, ending the Canadian threat for good.
At the end of turn six the Germans still controlled their zone, but just barely. Of the troops that began the game, there remained one assault platoon a bit reduced, a machinegun section, the Assault Company HQ, and Major Haase. The assault platoon is a scoring unit so that was enough for a German win. A very fun and good-looking game!
I also have to give a shout out to Jon at Blaze Away Miniatures for supplying the cavalry models. They are just super-nice, easy to paint and characterful. Rich at Dayton Painting Consortium generously supplied the sabres I used to convert several of the models, so thanks very much to him as well.


Monday, November 9, 2009

That's a LOT of figs! - 60,000 Point 40K Apocalypse Battle

The Battle for Armageddon


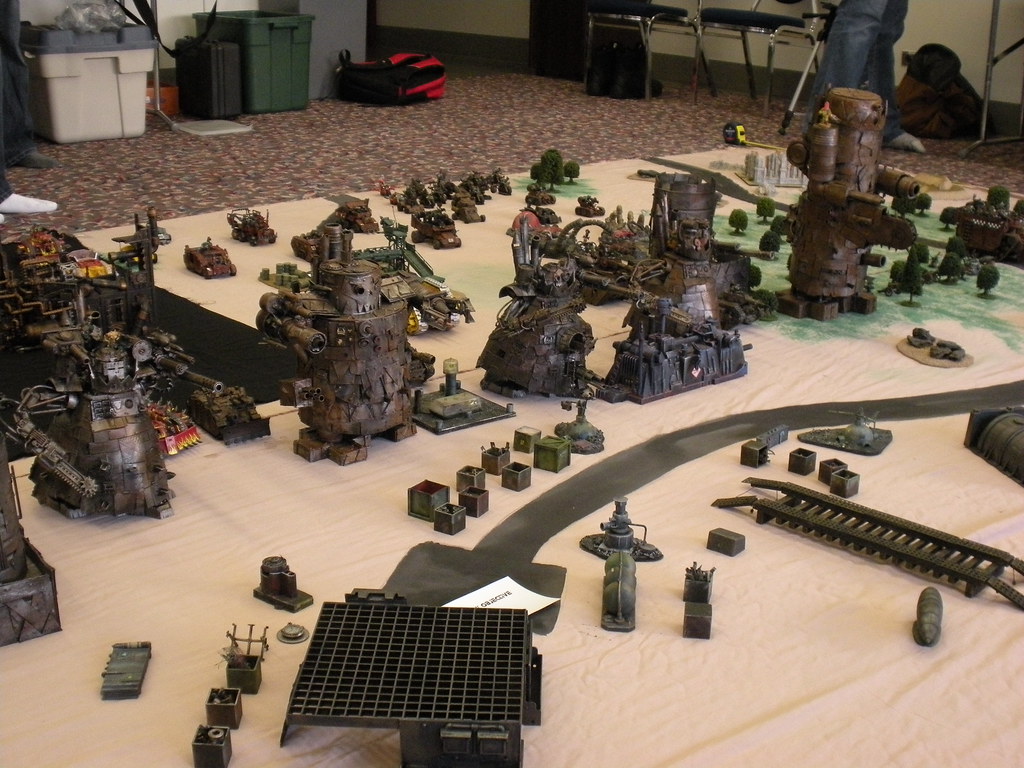
(click on the photos for larger images)

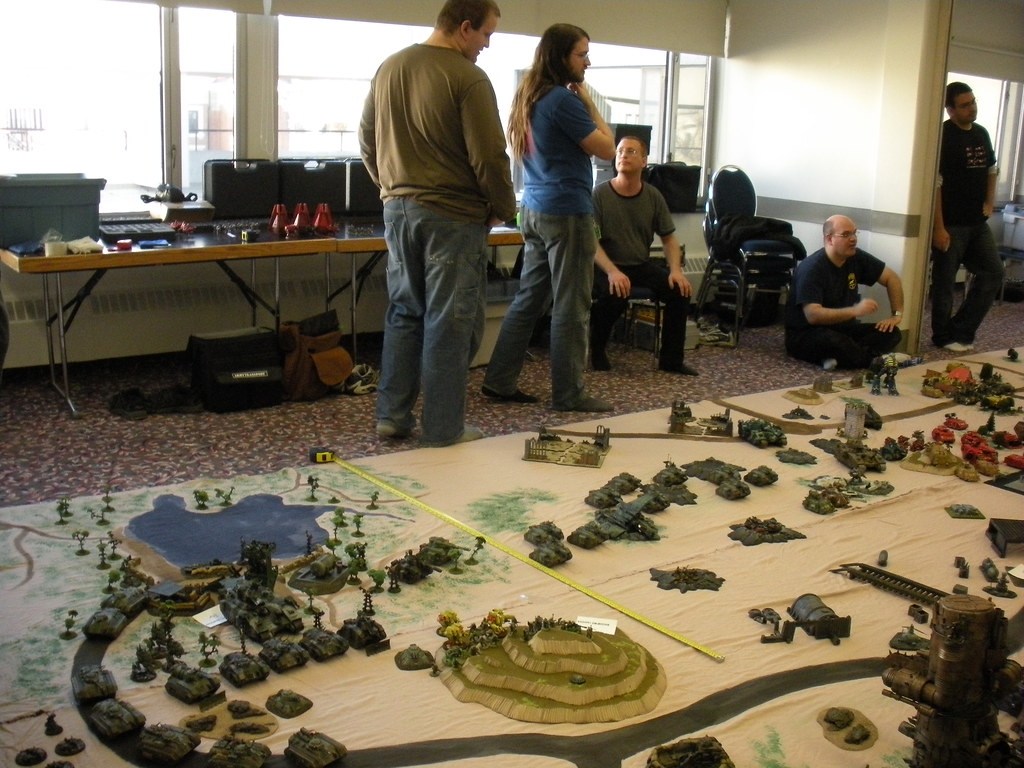
On Saturday, Nov. 7, the Astronomi-con boys (Christian, MikeM and Keith) organized a grand battle, involving a themed game between Orks and Imperials on the planet Armageddon. The Eldar played a third side, who had their own mysterious objectives.

As the morning dawned, the players gathered at the University of Manitoba for the game. As it turned out, 15 players showed up, with approximately 60,000 points worth of painted models, to battle it out.

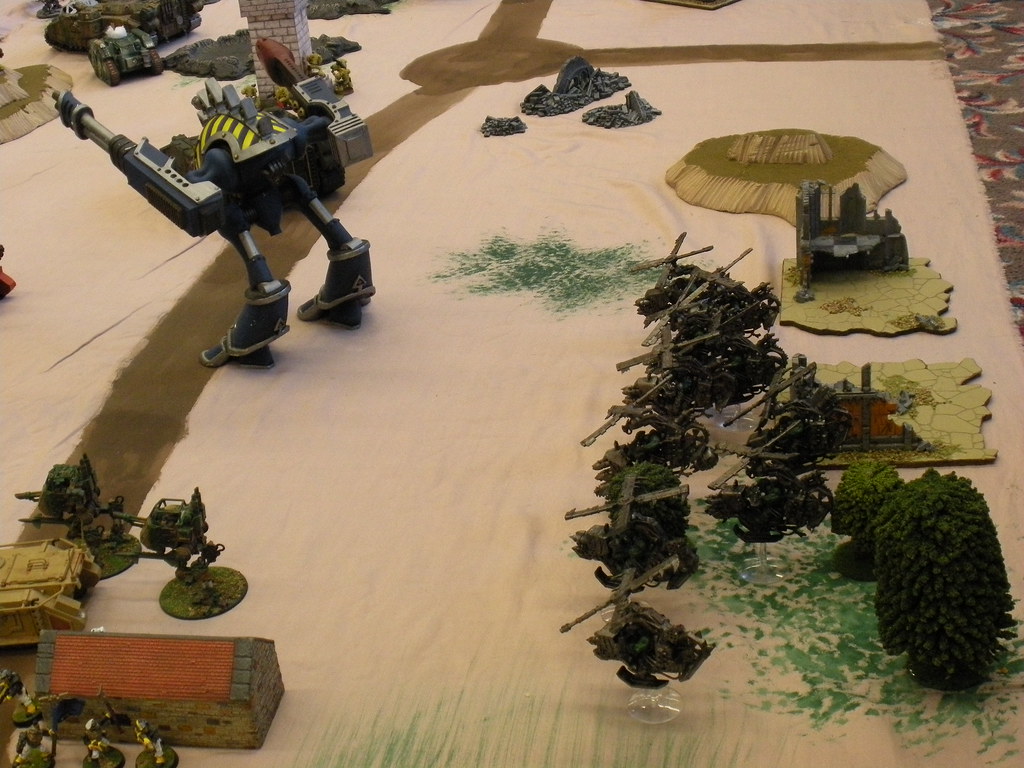
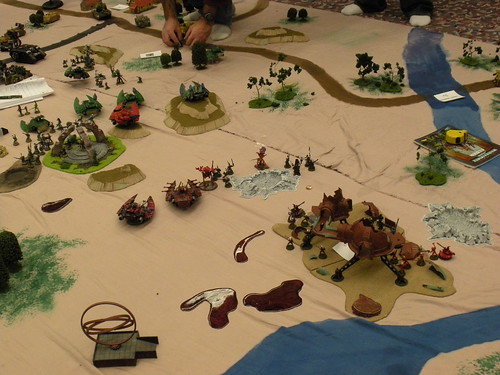
The photo above gives an indication of the scope of the affair. The 5 large Ork war machines in the photo are 4 Stompas and a scratch-built Gargant. That's a lot of dakka...

Scenario

As stated above, the game was basically Orks vs. Imperials (11 players total) with 4 additional Eldar players, including myself. There would be three factions' turns during the course of each game turn: Ork, Imperial, then Eldar.

Factions received victory tokens each turn for possession of various strategic locations on the board, for killing named characters, and for inflicting structure point damage against super-heavy vehicles. The margin of tokens at the end of the game would decide victory, but you could try to trade tokens between factions (for example, in exchange for a one-turn truce) and a faction could "cash in" tokens to purchase various in-game assets like orbital strikes, during the course of the game.

The complete rules of the grand battle can be found online here.

The Eldar could score tokens, usable to trade or buy assets, but for no other purpose. At the start of the game, we drew randomly from a set of scenario cards. On the card we drew, we were presented with a points spread between the Imperial and Ork forces - if the Imperials won by between 6-15 battle tokens, their victory would be downgraded and the Eldar would win a major victory. Other specified spreads on the card would result in Eldar minor victories or a loss.

So, the Eldar would have to try and manipulate the battle and manage its received victory tokens, to manufacture an Imperial win of the required spread. Very atmospheric.
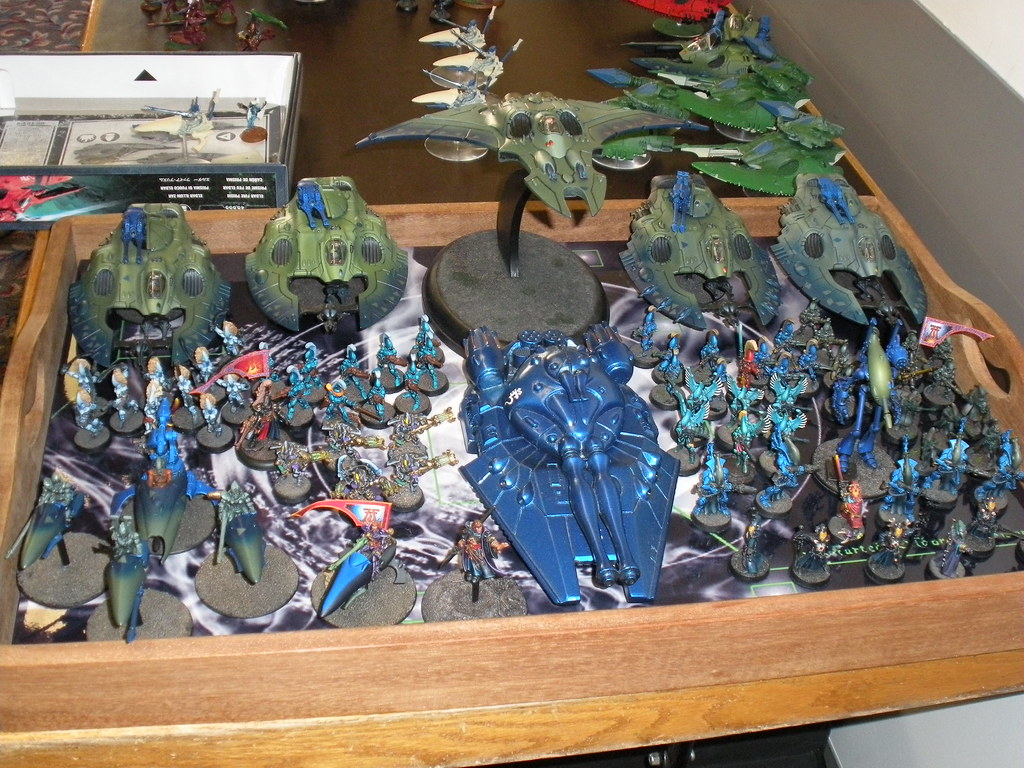
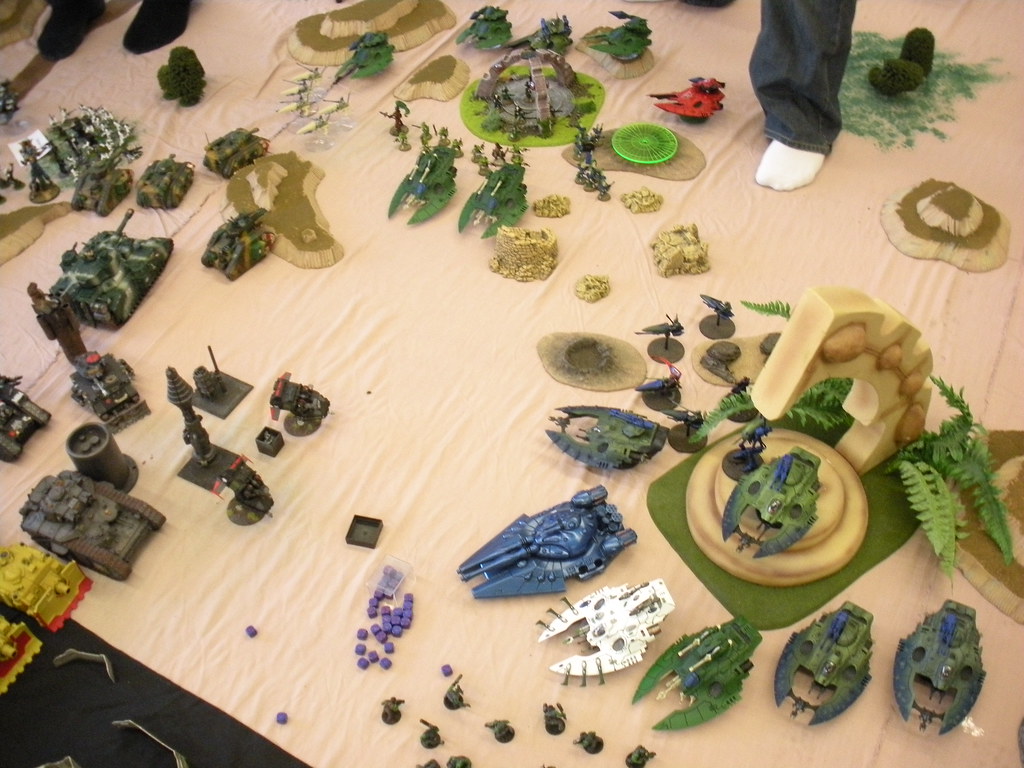
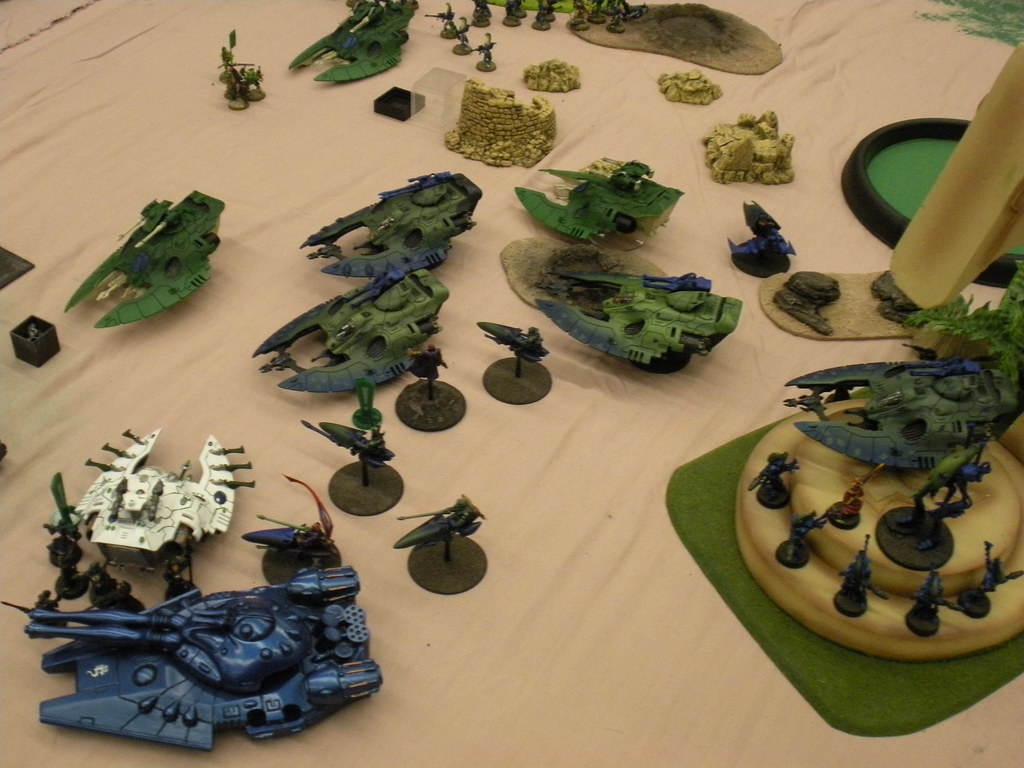
Forces

As usual, I fielded my Swordwind army. This time, I brought around 4,000 points of models. All the Aspect temples were represented, plus various psykers, other supporting troops, wraith constructs, a Nightwing aerospace interceptor, and a Scorpion superheavy grav tank (represented by the old Tempest superheavy from Armorcast):


Noah and Mike, two of the other Eldar players, also fielded Swordwind themed forces. The fourth player, Derek, had a mixed force of Guardians and Aspects. Between the four of us, we were able to field a 5-tank Fire Prism formation (controlled by Noah), a 5-tank Aspect Assault Wave (controlled by myself), and an ersatz air squadron of 3 Nightwing interceptors and a Phoenix fighter-bomber. The Eldar had the only aircraft on the board, so we had air superiority - but could those planes make any dent in the walls of steel we faced?

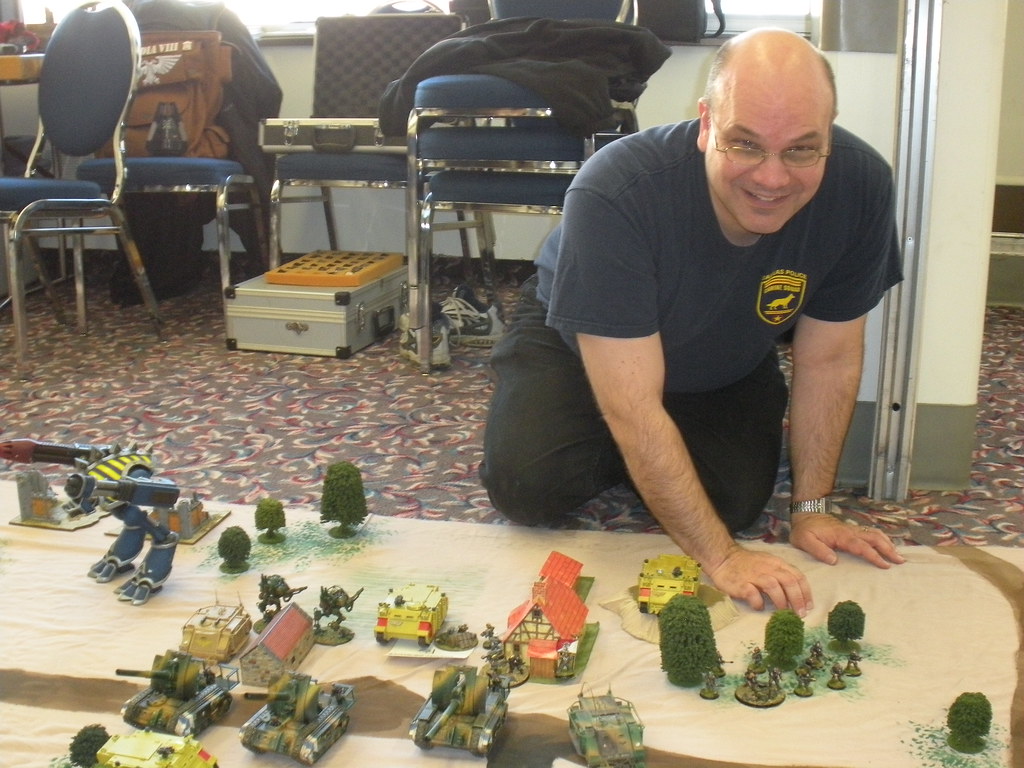
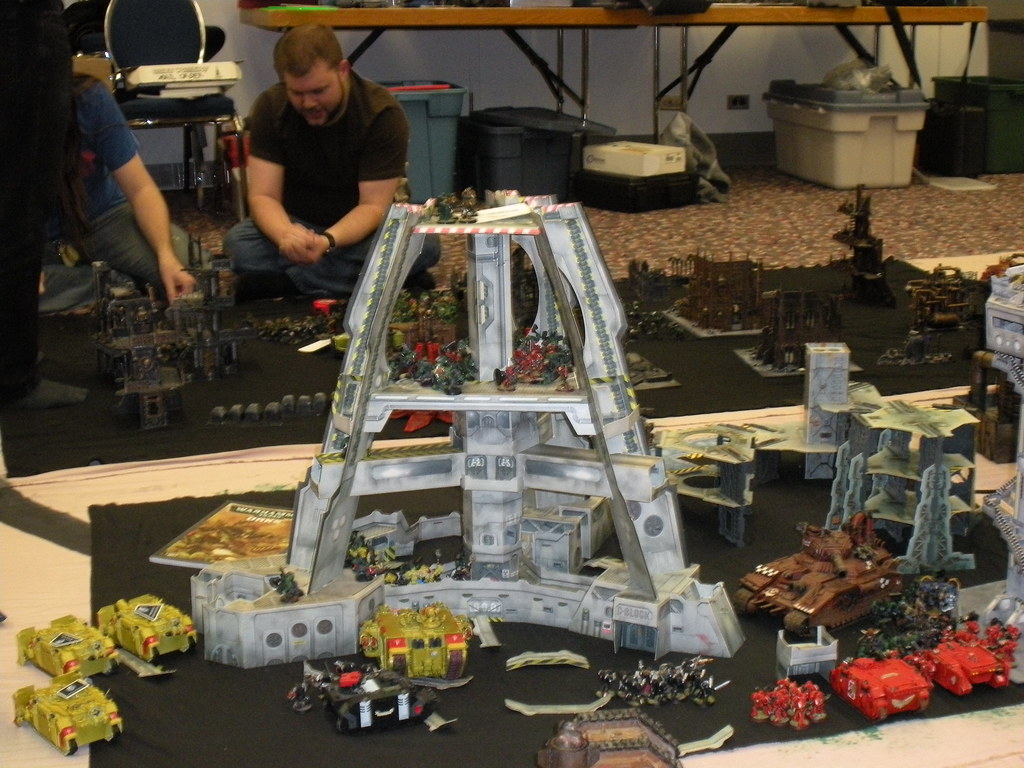
Below is a picture of Christian, who fielded all the Imperial Guard forces on the table immediately behind him. I think he likes tanks.


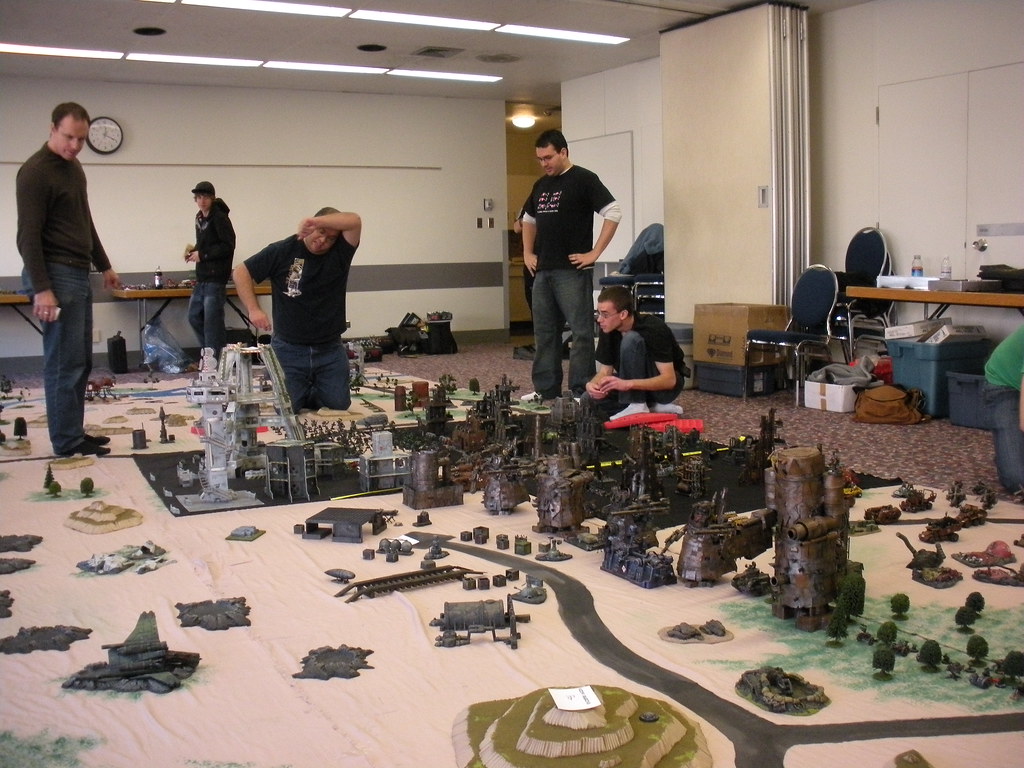
Below is a picture of MikeM, taken during the Imperial setup. Note the Warhound Titan to his right - a treasured relic from the mid 1990's.


The Game

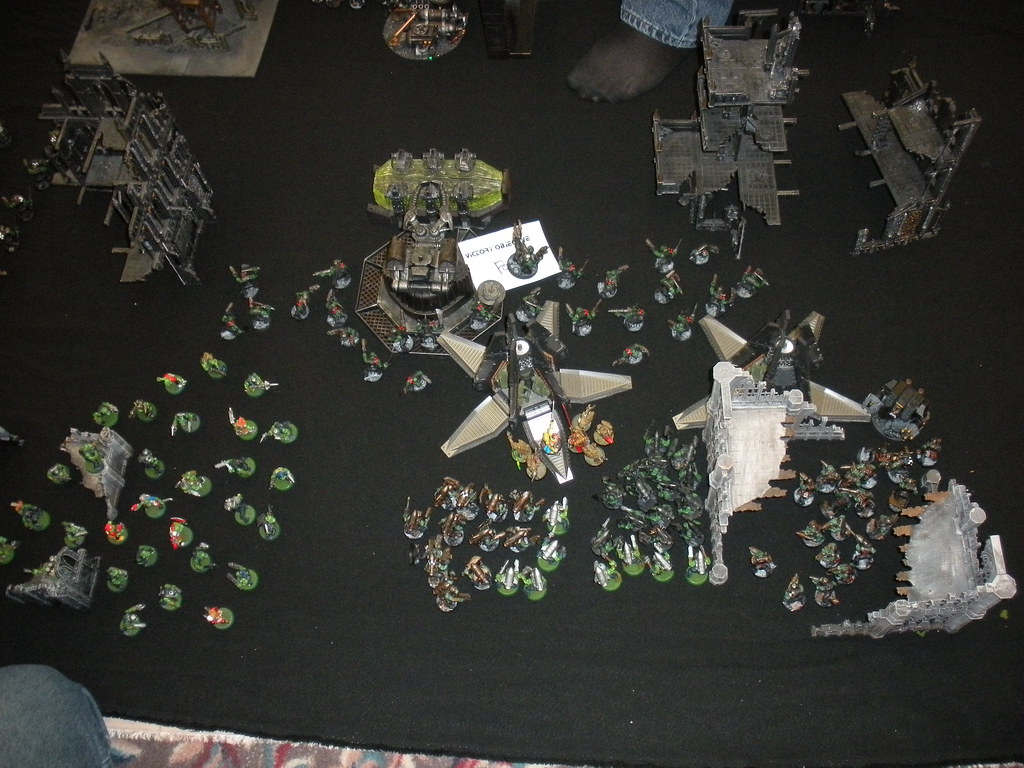
The Orks set up on a broad front, sending a "Green Tide" of Boyz towards the spaceport tower in the centre. They set up more Boyz to hold the city within the middle of their (South) board edge deployment zone. On their left flank they set up the heavy iron, multiple superheavies leading many, many more boyz on the ground.

Later on in the game, they ended up strategically deploying a multiple-Trukk Cult of Speed near a river crossing to the northeast, and a wing of jetbikes just north of the Warhound Titan.

The couple of hundred or so Boyz in the Green Tide by the spaceport looked awesome.


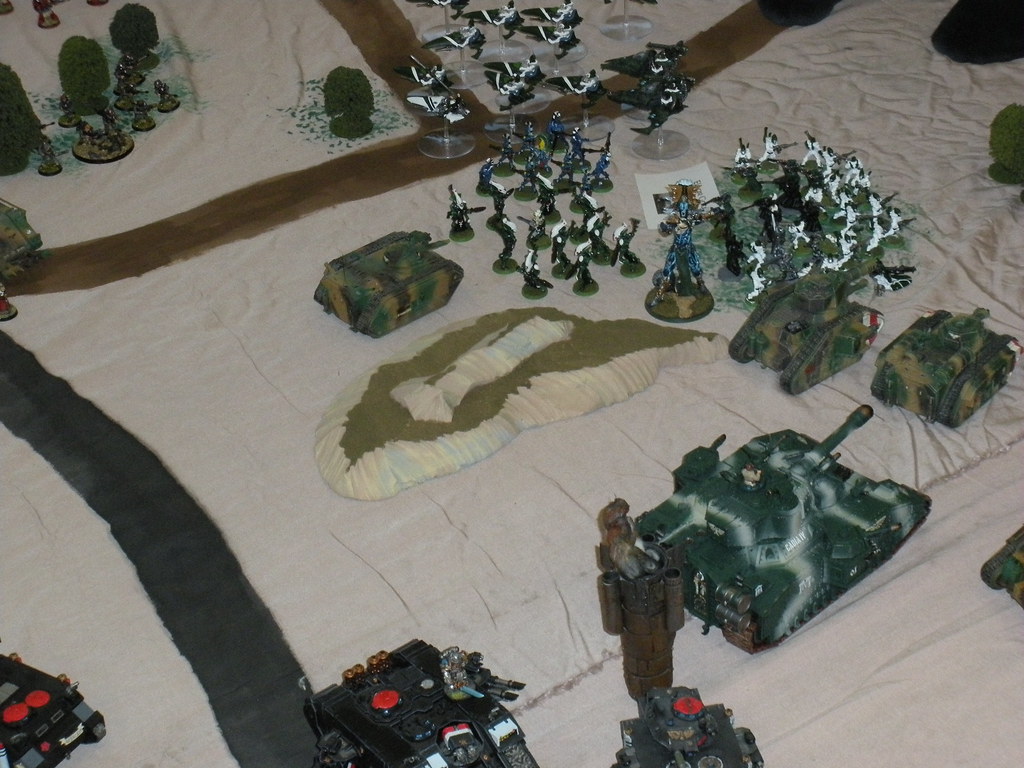
The Imperials set up mostly to the north and northwest. A couple of dozen Leman Russ tanks and Chimera APCs, backed up by some Baneblade and Shadowsword superheavies, would make their way towards a strategic hill in the west.

The Space Marines, including two(!) Vindicator Linebreaker squadrons, would make for the spaceport, supported by Imperial Guard and Grey Knights, and one each of Malchador and Baneblade superheavy tanks. Deep in the Imperial deployment zone, near the north board edge, Guardsmen occupied on or near a strategically located village with various supporting elements, including the Warhound Titan, some more Shadowswords, and a Basilisk artillery squadron.


The fighting started right away, with the Orks advancing towards the spaceport and the hill. Off board artillery was dropped on the close-packed Imperial forces, killing 2 of 3 Basilisks. Further fire from the guns of the Stompas and Gargant cut a swath through several tanks.

In return, the Imperials lobbed several extremely large blast markers at the Orks, inflicting several casualties that somehow didn't seem to make a dent in the greenskins' numbers.


Pre-game, the Eldar marked on maps where they would appear on the table, including Waygates (out of which any ground forces would move) that were deployed only at the start of the Eldar players' turn. Surprise!

The Eldar deployed entirely in the eastern third of the table, to help ensure that their outnumbered forces would not be separated and defeated in detail. Also, we set up each of the 4 Waygates within 36" of another one, to assist all the psychic activity we hoped to rely on. (Within 18" of a Waygate, Eldar psykers would automatically pass psychic tests and gain a strength bonus to strength-based psychic attacks.)

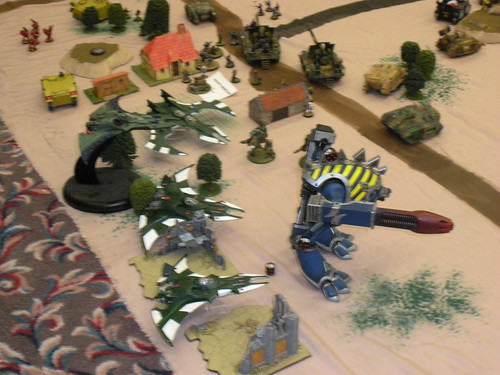
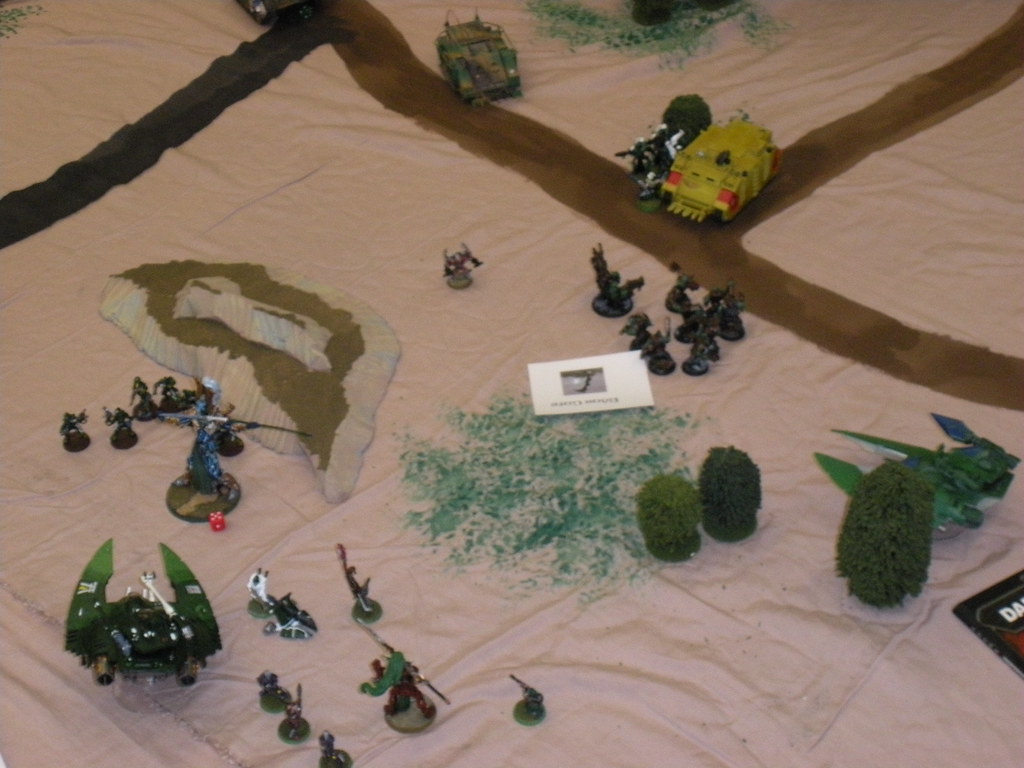
Below, from left to right, Mike's, Noah's and my forces stream out of their respective Waygates (we had models to represent two of these assets, and markers for the remainder).


Mike's forces quickly coming to grips with the enemy.


Looking at how the battle was shaping up, the Eldar decided to concentrate their efforts against the Imperials. After Noah dropped an orbital strike and I fired the Scorpion's Pulsars, the 6-gun Vindicator battery was reduced to one effective gun.


Later, the Imperials dropped several drop pods worth of Marines and Dreadnoughts in the middle of the Ork city, to take pressure off the spaceport and to be, basically, heroic.


The Ork jetbikes appeared to the rear of the Titan. IIRC, they managed to damage the Warhound, but were all killed by subsequent shooting.


The Eldar aircraft were kept in strategic reserve. When they came on, they concentrated on the Titan and the other superheavy tanks in the Imperial rear. The Titan lost all its guns, and had a single structure point remaining.

As the battle progressed, a giant scrum developed around the hill, involving the Orks vs. the Imperial Guard and some Space Marine Dreadnoughts. One Stompa cut a Shadowsword in two with one swing from its chainsaw. The big Ork vehicle to the right of the hill disgorged lots of Boyz, and the Gargant itself carried 20 or 30 more Boyz...

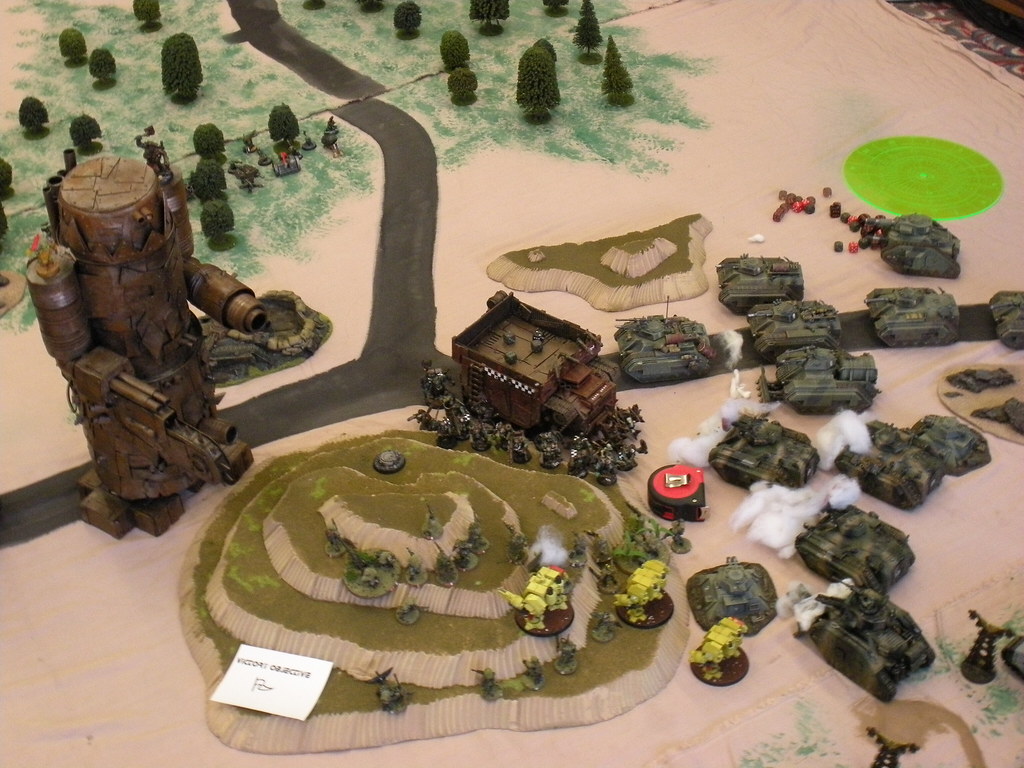
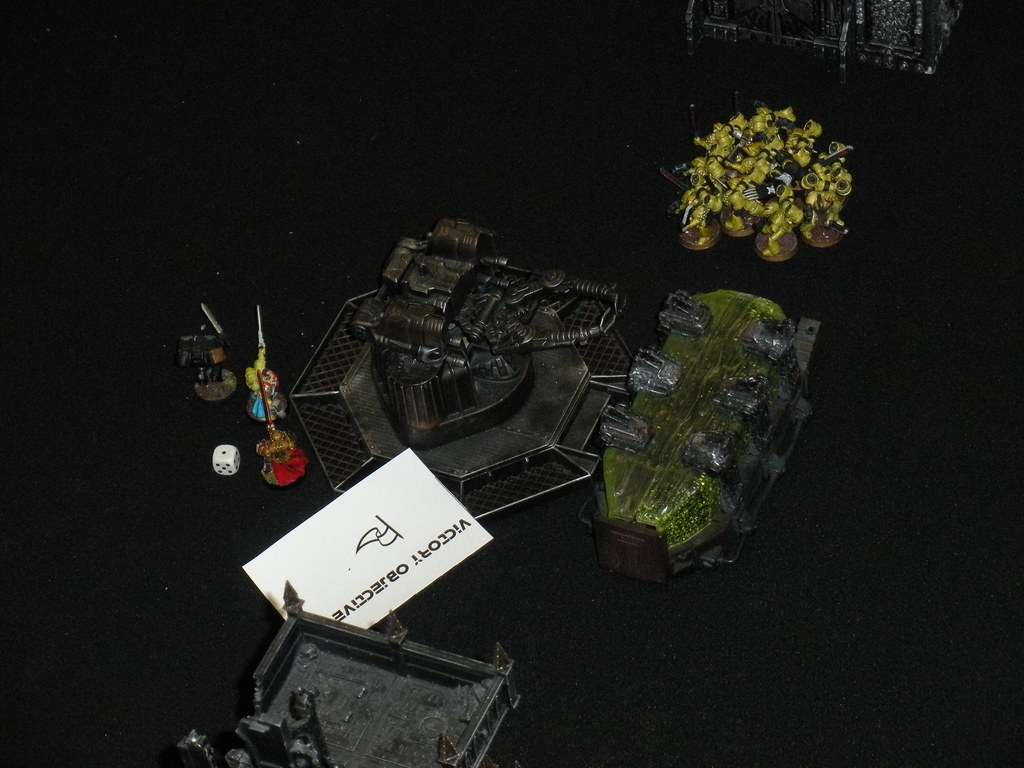
A pair of Ork Pulsa Rokkits landed beside the Malchador, the Grey Knights, and some other tanks, temporarily reducing their BS to 1 due to the seismic effects. Ouch!

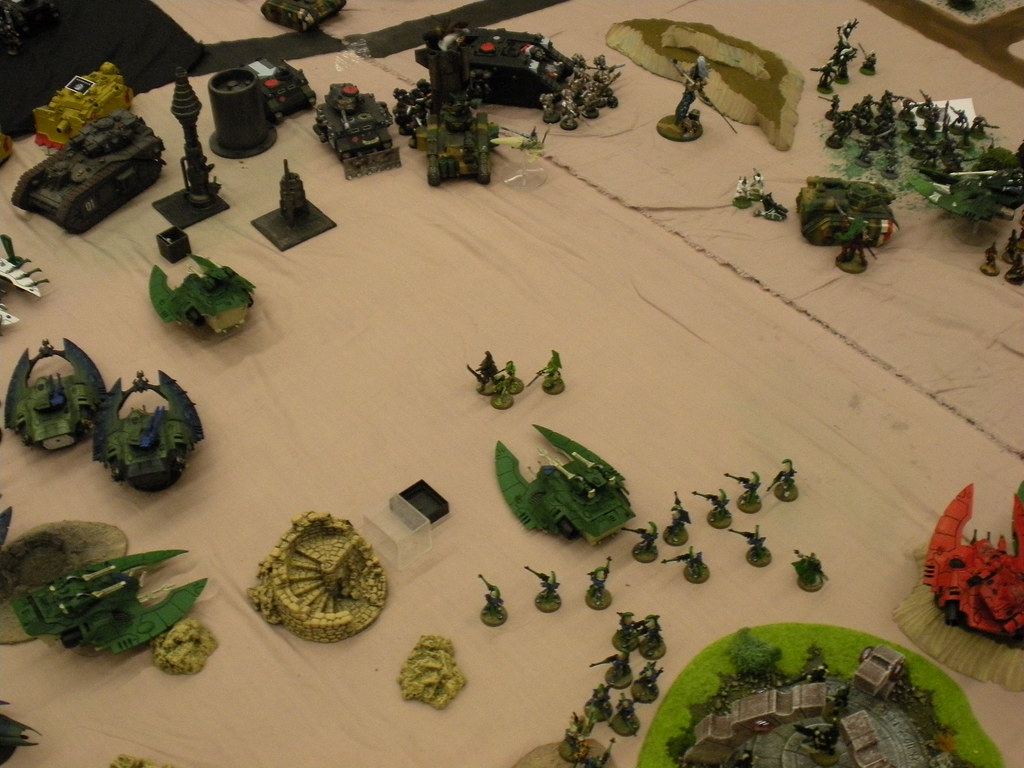
The large open area in the middle of the photo below was the former location of a Baneblade and several of Noah's Aspect warriors, consumed in the explosion of the Baneblade's reactor.


As the game progressed, the Scorpion superheavy tank and a mounted Seer Council led the Aspect Assault Wave towards the spaceport, which was protected to the east by the Malchador and the remaining Vindicator. The Malchador expended its fire against the Fortuned Seer Council.

After several rounds of epic close combat, the Marines finally took the Ork-occupied city. Only a few Battle Brothers survived to celebrate their glorious accomplishment.

In the centre, the Green Tide had been greatly reduced by the staunch Imperial defenders of the spaceport.


As the final Eldar turn started, the Eldar declined to buy any more assets and gave all their 19 victory tokens to the Orks. The Ork generals, being badly behind the Imperials, gladly accepted those tokens.

With the numbers of active/effective forces around the spaceport so reduced (the Green Tide was almost completely gone), the Scorpion superheavy tank led several other Eldar units in to capture the spaceport without firing a shot. The subsequent victory tokens for holding the spaceport would thus be denied to the Imperials.

Below, Mike's Eldar forces move away from their own Waygate, ceding it to the Orks. In this way, the Orks would gain a few more victory tokens.


Mike redeployed his 3 aircraft to the rear of the damaged Gargant, destroying it with massed Bright Lance and missile fire. This loss put the surviving ground forces around the hill at rough parity, so in the end no one controlled it - it was merely contested.

To the southwest, a unit of Thunderhammer/Stormshield Terminators had been holding a strategic bridge. Three squads of deep striking or jumping Swooping Hawks poured grenade and Lasblaster fire into them. The Marines rolled too many "1's" to keep the bridge. Derek's Hawks alone killed 3 Terminators:


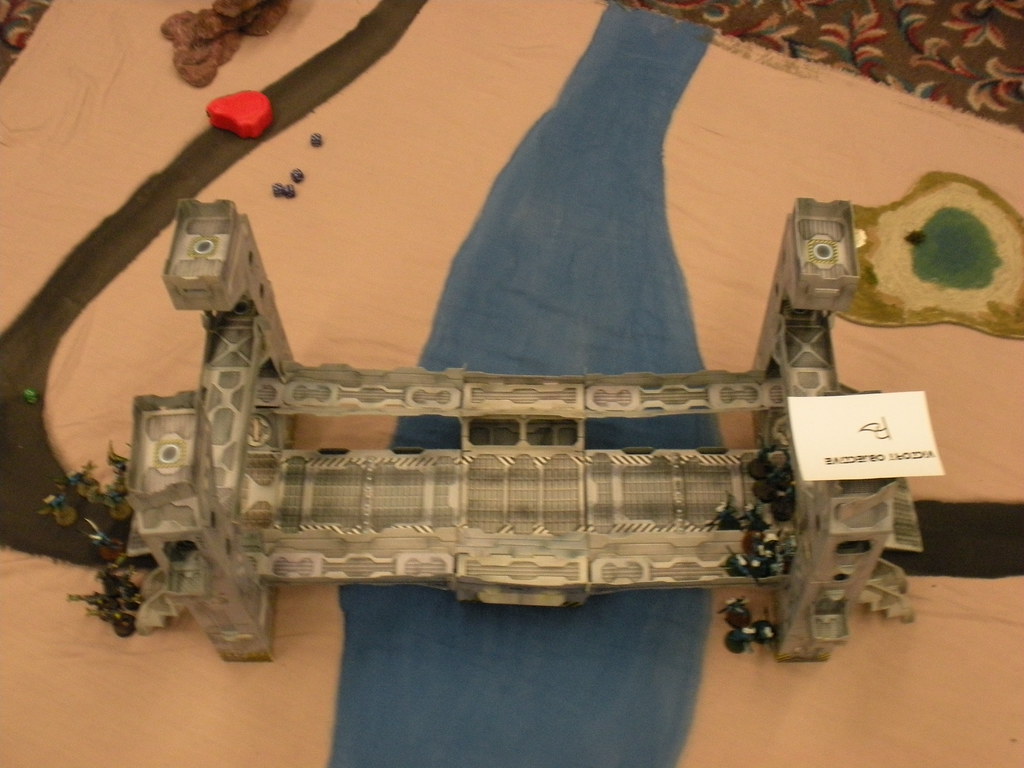
Derek's forces held onto the Waygate located within the collection of red buildings below:


In a final show of Eldar disdain, Noah fired the Fire Prism battery at the weaponless Warhound Titan, destroying it. This had no effect on the outcome of the battle; it was merely esthetically pleasing.

As the final victory tokens were tallied, the Imperial forces ended up with 61 tokens, 6 more than the Orks. The Eldar players revealed their scenario card, and the Eldar managed to steal away the win.

FINAL RESULTS:
Eldar = Major Victory
Imperials = Minor Victory
Orks = Loss

The Eldar victory conditions were very interesting. The Eldar forces had to manage their victory tokens and assets very carefully, and fight (or decline to fight) at the appropriate times. Kudos to Noah, who kept track of all the victory tokens won, expended and traded each turn by all three factions.

This was also the largest 40K game I have ever played in. Despite it being a floor game, no one's models were actually crushed underfoot. Phew!

Everyone involved seemed to have a fun time. I certainly did.